Get
Your Own Web Site!
FREE
1 year domain name!
The following informations were retrived from
a Peter Lynn mail in kitesurf group
The following drawing was found in the
kitesurf file section
Pictures from Colin Gowland
all those files were
shared for mutual information
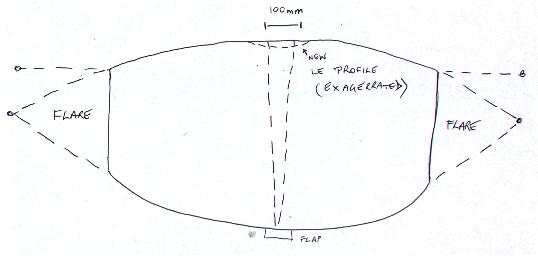
WEDGING INSTRUCTIONS
Top Skin
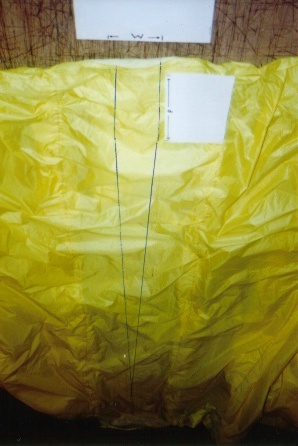 1.Measure
distance (w) in center panel of kite at the leading edge where the top skin meets
the bottom skin.(w) will vary for different kite size e.g. .1120 ARC 120mm,840
ARC 100mm. (see photo "marking out"). This is the suggested measurement that gives
suitable results. The more wedge that is added gives more depower but the long
term effects are less certain
1.Measure
distance (w) in center panel of kite at the leading edge where the top skin meets
the bottom skin.(w) will vary for different kite size e.g. .1120 ARC 120mm,840
ARC 100mm. (see photo "marking out"). This is the suggested measurement that gives
suitable results. The more wedge that is added gives more depower but the long
term effects are less certain
******I vedged my 11.2 140 mm and the result is really good. it has good depower and GREAT turn ability added.
the only cons is the kite shows a little tendency to luff. Probably 120 mm is really the best configuration******
2.Measure
distance (p) where the wedge line runs parallel for 1/8th the chord length.
The wedge is then a line that runs from this point to the middle of the center
panel at the trailing edge.(see photo "marking out")
Bottom
Skin
1.The wedge starts at the same point and is the same measurement (w)
as the top skin where top and bottom meet at the leading edge.
This time there
is no parallel section .The wedge is simply drawn from this point to the middle
of the center panel at the trailing edge.
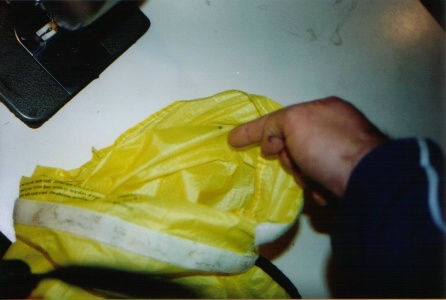
Sewing
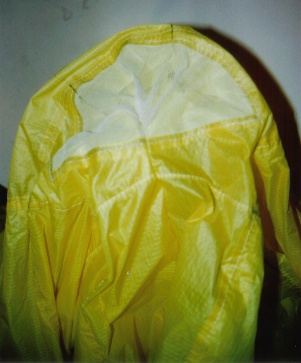
1 Open the kite at the release valve and find the point at the trailing edge where
the wedge ends (see photo "pointing")
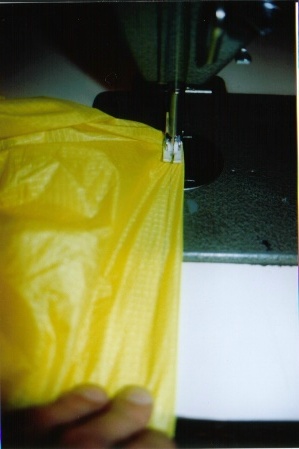
2.Pull the kite inside out through the
trailing edge (this can be done gradually as you progress with the sewing) draw
the two sides of the wedge together and sew starting at the point in photo "pointing".
( and see photo "sew" and "long sew")
3.Sew along the wedge until you get
to the intake valve (see photo "valve" > >this is the outside view after the kite
is the correct side out, the top skin in this photo is yet to be sewn) .
There
is no need to sew the intake valve together through the valve or the gauze the
valve will be smaller but we have found that this does not appear to effect the
inflation or performance. It is desirable that when you get to this point that
the two sides match. (my first kite was a rather rough job where they did not
match and the reinforcement cord that runs across the kite did not match 6 months
down the track and many hours later the kite works fine and incidentally after
landing it on a fence it received many tears and was simply stuck with duct tape
which is also working well.)
***** On my home made wedging my aunt proposed to reinforce the sewing by placing a strip of stronger fabric in the sewing
that was a GREAT idea. I've used and abused my kite and the sewing is still perfect and the fabric show no sign of stretch or tears.
And as I know my english is not really good here you an international speacking drawing of what I mean.******

4.The excess that should be inside the kite
does not need to be cut away
In fact there is no cutting at all in the process
5.Go out and have fun
 pointing
 sew
sew
 long
sew
long
sew
 valve
valve
Get
Your Own Web Site!
FREE
1 year domain name!